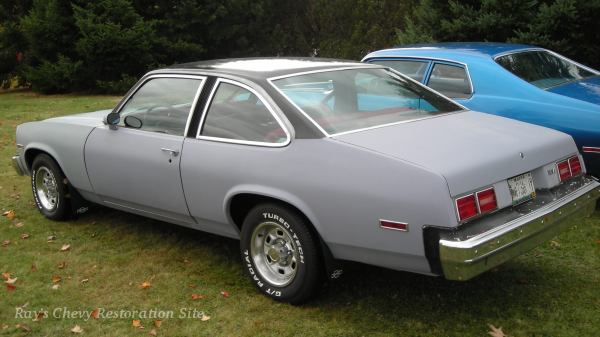
Page 5 of 6 ... July 2005 - May 2012
July 2005 -- Quarter Windows and Trunk
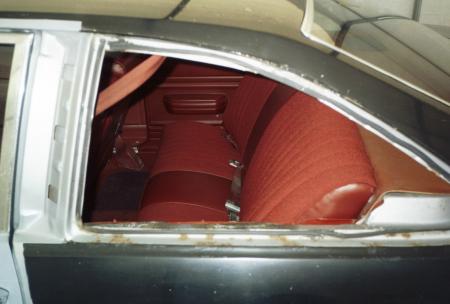
Back when I first bought the car I noticed some pitting and touch-up paint along the lower edges of the rear quarter windows. I knew that there was likely more rust hiding under the rubber gaskets so today I finally removed the windows in order to fix the problem. These windows come out as an assembly (window glass, rubber gasket, and exterior trim). In order to remove them, I first had to take out the plastic interior trim pieces. With those out of the way, I was able to lift up the lip on the inside of the rubber gasket and carefully work it over the pinchweld flange around the perimeter of the window opening. I used some plastic sticks (obtained from a friend in the auto glass business) to pry on the rubber gasket without damaging it. As faras I know, no one is reproducing these quarter window gaskets for 75-79 Novas so I'll have to clean and re-use them.
As I suspected, there was a fair amount of surface rust and even a few pin holes hidden under the rubber quarter window gaskets. I used a 3M paint and rust remover disc on an electric drill to remove the surface rust. I filled the pin holes using my MIG welder.
While I had the windows out, I also stripped the old black paint from the drip rail area and an inch or so below the window area. I then primed and painted the window opening areas with the silver paint that I'll eventually be using on the whole car. The above photo shows the driver side window opening in the primer stage.
After cleaning the quarter window rubber mounting gaskets and polishing the aluminum quarter window trim, I put the quarter window glass/gasket/trim assemblies back together. I used some 3M strip caulk in the groove to seal the glass to the rubber. I also placed some strip caulk around the perimeter of the window openings before putting the windows back in the car. In order to re-install the quarter windows, I wrapped a length of thin nylon cord around the outer groove in the rubber seal. With a helper holding the window in place, I slowly pulled the cord out from inside the car. That drew the lip of the rubber gasket on over the pinchweld flange around the window opening and made re-installing the windows rather easy.
August 2005 -- Trunk and Tail Panel
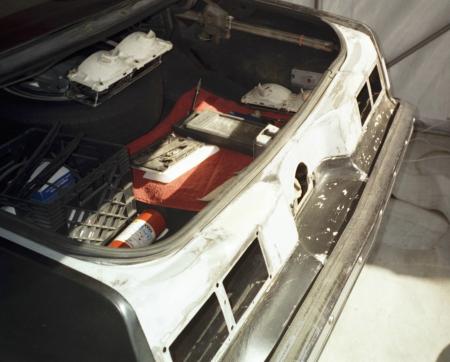
As I mentioned on Page 4, I had fixed up a replacement trunk lid over the winter. However, before putting it on the car, I stripped and re-painted the trunk opening area and tail light panel. Minimal prep work was done on the car's previous paint jobs so I was able to peel off most of the old paint using a razor blade scraper. I also removed the old cracked seam sealer and replaced it with new 3M "Fast 'n Firm Sealer".
While removing the old paint from the tail light panel, I discovered some surface rust around the tail light openings as well as a couple of poorly filled dents above the tail lights. I used a 3M paint/rust remover wheel to eliminate most of the surface rust and then applied a couple coats of POR15 around the tail light openings. I also removed the poorly applied filler, hammered out the dents above the tail lights, and applied a skim coat of new filler
With all the prep work done, I primed and painted the trunk opening area silver. I left the tail light panel in primer. I think I might paint that dark gray to match the grille. Finally, I installed and adjusted the replacement trunk lid before painting the underside of it silver.
September 2005 -- LH Quarter Panel Rust Repair
Back in June 2003, I repaired some rust on the lower/rear section of the passenger side quarter panel by cutting it out and welding in a home made patch panel. The driver side also has some rust in the same area but not as extensive as the passenger side. So I made a similar repair on this side with a smaller patch panel.
There is some body filler on the front part of the driver side rear wheel opening as well. I think it's hiding either a rust hole or a large dent. I'll work on that later when I finish stripping the old black paint off the quarter panels.
June - October 2007 -- LH Quarter Panel Paint Removal & Primer
After taking some time away from the Nova to work on other projects, I'm now getting back to working on it again. I stripped the paint off the driver side quarter panel and removed the body filler I mentioned above. Fortunately, it was filling a dent rather than a rust hole. I don't own a stud welder so I used my MIG to tack weld some nails to the dented area and pulled most of the dent out with a slide hammer.
I ended up getting busy with some other projects agin this summer and only managed to get the body work and primer done on the driver side quarter panel. The other quarter panel and roof will have to wait until later since the car is going into storage for the winter again. I haven't bothered doing anything with the rear bumper filler panel since I plan on replacing it with one off a parts car that's not as caked up with old layers of paint.
November 2011 - March 2012 -- RH Quarter Panel Paint Removal
After getting sidetracked with some other projects yet again, I've finally got the 77 moved out of the back corner of the garage where it has sat for the past four years. My goal for this winter is to finish stripping the remaining old black paint off the roof and passenger side quarter panel. Hopefully I won't find any major dents, rust holes, or other problems under the old paint.
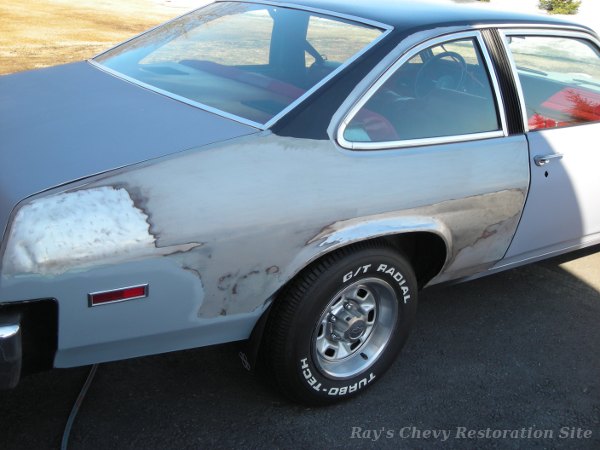
I've been helping Dad with the 409 swap in his 63 Impala and haven't done a whole lot on the Nova this winter. But I did manage to get the old black paint off the passenger side quarter panel. A razor blade scraper took most of it off fairly quickly. The factory silver paint still remains in some of the undamaged areas. Other spots had old body filler work so I sanded those down to bare metal to see what was underneath.
Luckily, I didn't find any rust but there are a few dents that will need to be pulled/pounded out before spraying on some primer. The primered area around and below the side marker light is where I had already welded in a patch panel to fix some rust several years ago.
The above photo also shows an area on the trunk lid that needs some additional work to make it line up with the top edge of the quarter. This trunk lid (off a parts car) was dented in that area and I straightened it out but it still needs a bit more.
April - May 2012 -- Finished up the RH Quarter Panel
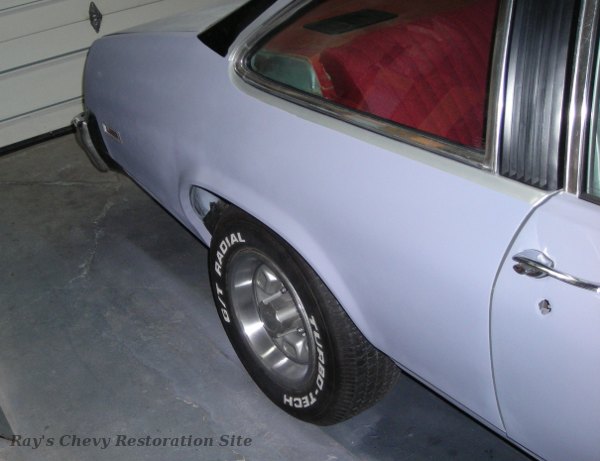
The bodywork on the passenger side quarter is finished. Since the quarter windows in these years don't roll down, there is limited access to the inside. So I ended up buying a stud-welder to pull the dents out of the fender lip and forward part of the quarter panel. The stud welder does burn off the primer/coating on the backside of the panel, leaving it vulnerable to rust. However, there are some small acccess holes in the inner structure so I was able to spray some 3M Rust Fighter cavity wax on the backside of the repaired areas.
At this point, the quarter (like all the other panels I've done) has a coat of epoxy primer (to prevent rust) and a couple coats of 2K urethane primer that will need to be block sanded before final primer/paint. I was hoping to get the roof similarly prepared this winter but that'll have to wait.
- Continue on to Page 6 (December 2012 - present ... Roof, Windshield, and more Interior work)
- Return to my 77 Nova Page
- Return to Ray's Chevy Restoration Site Home Page
- © 1998 - 2023 Raymond McAvoy. All Rights Reserved.