Page 6 of 8 ... February 2012 - August 2012
Late February 2012 -- The 409 is Finally Installed
After years of prep work (and taking time off for other projects), we finally had everything ready to install the 409. We carefully lowered it into the 63 this evening and it went right into place without any trouble.
March 2012 -- External Engine Parts Assembly
Now the work begins on installing all of the external engine parts and pieces.
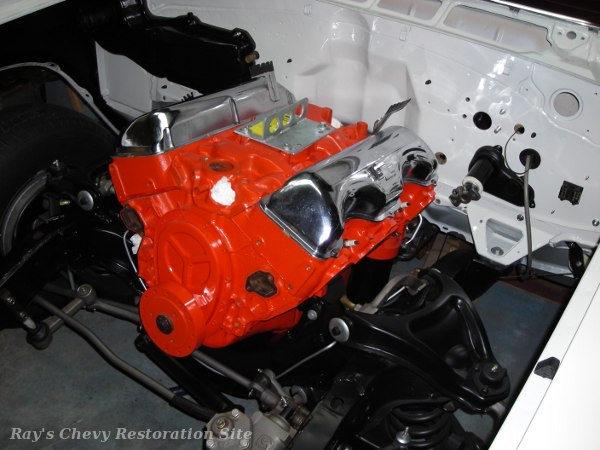
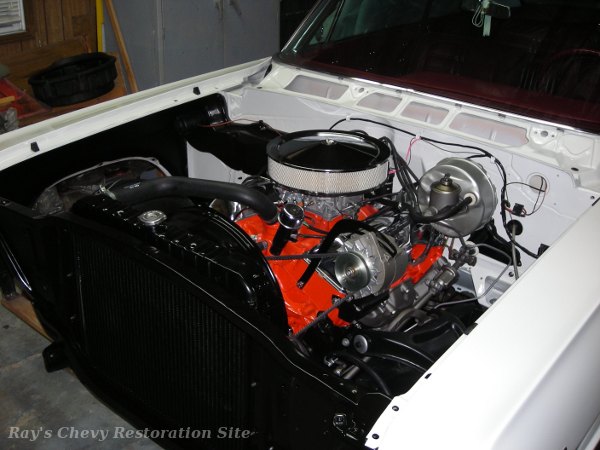
First to go on were the original exhaust manifolds that we got with the 409 (I sandblasted them and painted them with POR Factory Manifold Gray high temp paint). Next was the new mandrel bent exhaust system from Shafer's Classic Reproductions with Walker DynoMax mufflers. Then the water pump. It's an original GM pump that also came with the engine and I rebuilt it using a kit purchased from Show Cars Automotive, Inc.. The distributor was missing when we got the engine so a complete remanufactured one was purchased (also from Show Cars).
The specific model of Rochester 4GC carburetor originally used on the 340HP 409's are rather hard to find (and usually expensive) so we chose to run a Carter AFB instead. I rebuilt a good used Carter 9625 (625 CFM electric choke) and converted over to a hot air choke. The AFB bolts right on to the stock 340HP intake manifold without the need for an adapter. However, we did have to add a ½" thick spacer to allow the hot air tube to clear the top of the valve cover. To pump fuel to the carb, we chose an Airtex 4657. It's a readily available replacement mechanical fuel pump that looks very similar to the original equipment AC pump.
Finally, a new American Autowire Factory Fit engine wiring harness was installed along with a new reproduction ballast resistor. The 6-cyl and small block V8 engine harnesses use a built-in resistance wire to power the coil but the 409 engine wiring is configured for a ballast resistor mounted on the firewall.
April 2012 -- The Parts Assembly Continues

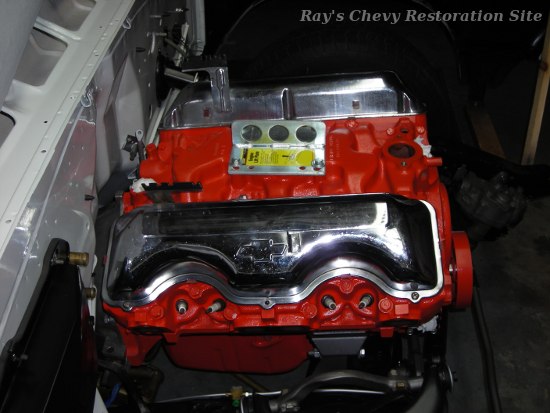
In this pic, the new AC Delco distributor cap and rotor have been installed along with a set of reproduction spark plug wires. The power steering pump and oil filler tube (both re-used from the 327) have also been installed. Although the PS pump itself is the same, we did have to change the mounting brackets and pulley (both reproductions from Show Cars). Fortunately, the original alternator mounting brackets did come with the engine so I simply sandblasted and re-painted those.
The air cleaner is just an aftermarket one from Summit Racing that we'll be using temporarily until we either find a good used original or buy a reproduction.
Readers with a sharp eye may notice that there is now a different harmonic damper on the engine than in the earlier photos. The damper shown in the earlier photos is a generic aftermarket replacement for a small block Chevy. The timing mark on that damper was about 10° off and I had used some white paint to make a new mark in the correct location. However, while we still had easy access, we decided to replace it with a correct remanufactured original from Damper Doctor.
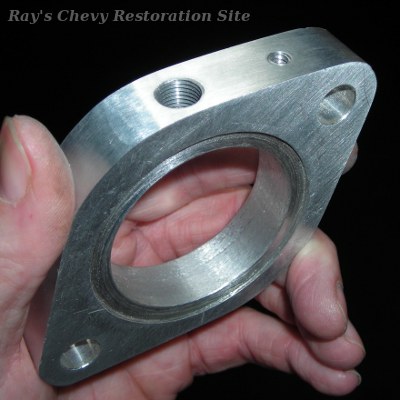
As shown on the previous page, we added a panel of AutoMeter gauges to monitor the engine oil pressure, water temperature, and voltage. However, the 409 cylinder heads do not have any holes that can be used to install the temperature sending unit for the AutoMeter gauge. And the intake manifold only has holes for the temperature light switch, bypass hose, and heater hose; all of which will be used for their original purposes.
So to avoid drilling an extra hole in the intake manifold, I made a small spacer (shown left) from some ⅝" thick aluminum to go between the intake manifold and thermostat housing. I drilled & tapped a ⅛" NPT hole in the side of the spacer that will accept the AutoMeter temperature sending unit. And since this spacer will be sandwiched between two gaskets, it won't provide a good electrical ground for the sending unit. So I also drilled and tapped a #8-32 hole for a machine screw that will be used to attach a ground wire.
After taking this pic, I painted it Chevy orange so it blends in with the intake and thermostat housing. The thermostat is located on the top side of this spacer. That places the sending unit below the thermostat so the gauge can provide an accurate reading of the engine temperature even when the thermostat is closed.
May 2012 -- More Parts Assembly
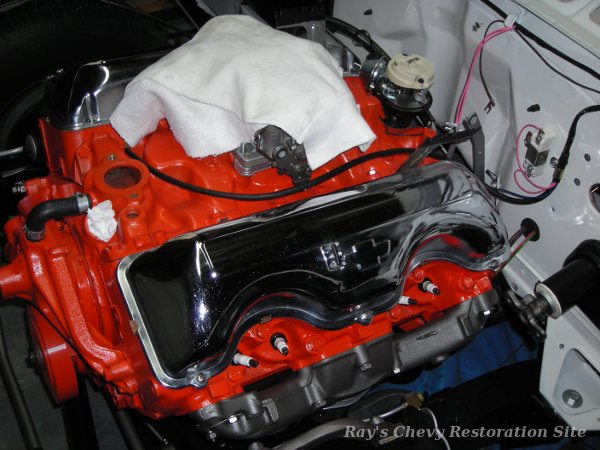
At this point, we've bolted the radiator support, radiator, and fan shroud into place. The radiator is a reproduction 4-core copper/brass unit from Show Cars and the shroud is a good used one that I sandblasted and painted.
The alternator (which was re-used from the 327) has also been installed on the 409 brackets. We found a good used 7-blade clutch fan in our stash of spare parts (I think it came off an early 70's Chevy truck with A/C). That blade fit perfectly in the shroud and is attached to the engine with a new Hayden 2705 thermal clutch.
June 17, 2012 -- Start Up
We started up the 409 for the first time today. It fired right up and ran okay but we soon discovered that the power brakes weren't working. A quick check with a vacuum gauge revealed only 8 or 9 in. Hg. of manifold vacuum.
After verifying the ignition timing and not finding any vacuum leaks we came to the conclusion that the low vacuum was a result of incorrect valve timing. Back when we built the engine, we decided to re-use the existing cam and lifters since they were still in good condition. We did replace the timing set since the chain was loose. Unfortunately, we didn't have any specs on the old cam (the lobe lift measurements were consistent but didn't match any of the stock 348/409 cams). So I just installed the timing set "straight up". As it turns out, that wasn't such a great idea.
Summer 2012 -- A New Camshaft
We decided to get rid of that old "unknown" cam and replace it with a new Isky H-647 cam (#0911 from Show Cars Automotive, Inc.) along with some new lifters. Fortunately, we hadn't bolted the grille or front bumper back into place yet so it wasn't too much trouble to simply pull the radiator support (along with the radiator & shroud still attached) back out to make room for the cam swap.
Now that we were working with a new camshaft with known specs, we were able to set this one up with a degree wheel. This solved the low vacuum problem and the engine runs great.
- Continue on to Page 7 (September 2012 - September 2015 ... More Detailing and Miscellaneous Projects)
- Skip to Page 8 (October 2015 - present ... A Few More Updates)
- Return to Dad's 63 Impala Page
- Return to Ray's Chevy Restoration Site Home Page
- © 1998 - 2023 Raymond McAvoy. All Rights Reserved.