Page 5 of 6 ... March 2017 - August 2017
Late March 2017 -- Installing the 327 & Overdrive Transmission
With the engine hanging on the hoist (and some old carpet & a towel on the floor to protect the oil pan), we bolted up the flywheel, clutch, and bellhousing. I believe the original paint application on the bellhousing was more of just an overspray but I chose to give this one more complete coverage. As mentioned back on page 4, the orange valve covers and old painted over spark plugs were simply used as masking (and to keep dirt out during storage).
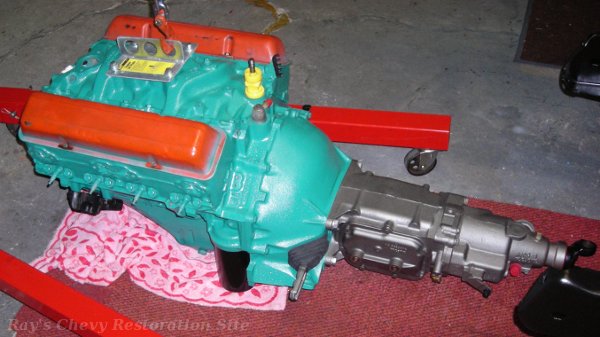
We figured it would be easier to slide the transmission into place while the engine was out of the truck rather than try to lift it up into place from underneath. And we temporarily removed the overdrive solenoid to eliminate the possibility of it hitting anything and getting damaged during the installation.
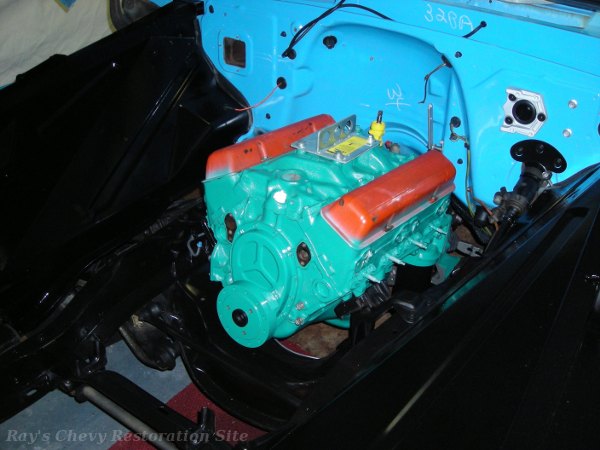
The engine & trans went right into place without any trouble.
April 2017 -- Some Transmission Related Changes
Changing from the old SM-318 (4-bolt side cover, non-synchronized 1st gear) three-speed transmission to this Saginaw SM-326 (7-bolt side cover, fully synchronized) transmission required a few changes. I believe these changes would also apply to the non-overdrive versions of the Saginaw 3-speed as well (although the driveshaft length may be different).
Driveshaft:
The driveshaft needed to be about 5 ½" shorter. Rather than have the existing shaft shortened, we chose to have a local driveshaft shop make a completely new one.
Slip Yoke:
The SM-318 had a coarse 16 spline output shaft while the Saginaw has a fine 27 spine. The 27 spline slip yokes are fairly common and we happened to have a good used one in our spare parts collection.
Bellhousing Bolts:
Trucks originally had the lower 2 transmission mounting bolts going through un-threaded holes in the bellhousing and threading into the mounting ears on the transmission case. But this overdrive transmission we're using came out of a car so the lower mounting ears were un-threaded. To work around this minor issue, we simply used a couple of longer bolts with nuts located inside the bellhousing (accessible with the lower inspection cover removed).
Speedometer Cable:
The cable hookup point is farther back on the Saginaw transmission so we installed a new speedometer cable that is slightly longer than the original. If I remember correctly, the new cable was part number 24-574 from ClassicParts.com. It is 72" long.
Column Shift Linkage:
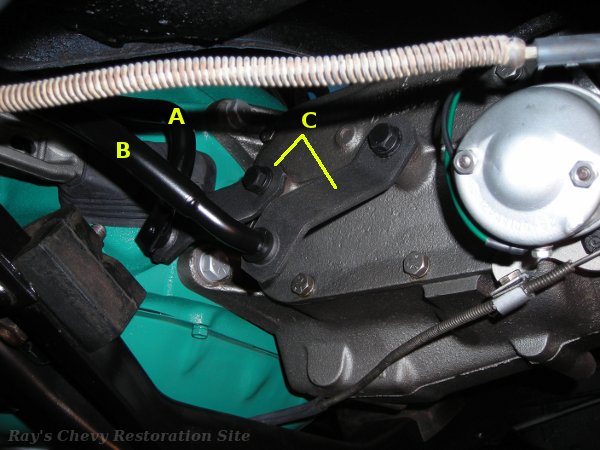
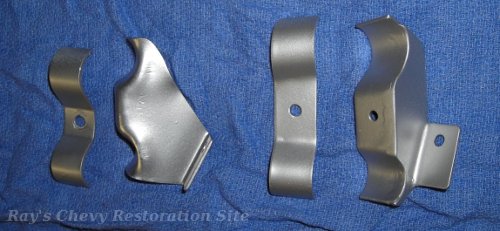
- The existing 2nd / 3rd rod (marked "A" in the photo below) was a direct fit with the Saginaw transmission. I belive the GM part number for this rod was 3873163.
- However, the existing 1st / reverse rod (marked "B" in the photo) was too short. I believe this rod was GM #3873159 while the overdrive option used a #3873161 rod. And since 1966 was the first year to use the Saginaw (in overdrive applications) and the last year for this body style of truck, it makes the #3873161 rod a one year only part. We knew the chances of finding one would be very slim so we first tried using a rod from a newer 69-72 truck that had a Saginaw 3-speed. But that didn't end up being a very good fit in the '66 so we ended up lengthening the existing 1st / rev rod 3 ¼" by welding in a piece of steel tubing as shown by member Sizemore 65 in this Saginaw swap thread on the 67-72chevytrucks.com site. We also had to add an additional bend to this rod to avoid interference with the outer end of the clutch fork when shifting into reverse.
- On the side of the transmission, we used shift levers (marked "C" in the photo) off a Saginaw 3-speed from a 69-72 Chevy truck. These are GM #3885517 (1st/rev) and #3885518 (2nd/3rd). Although discontinued from GM, these can still be found as good used or NOS (New Old Stock) with a bit of searching.
- We also took the opportunity to tighten up the linkage by replacing all of the little bushings / grommets that often get worn or deteriorated with age. A GM #3833108 grommet was originally used where the upper end of the 1st / reverse rod connects to the steering column. A replacement is available as part number 91-062 from ClassicParts.com. The upper end of the 2nd / 3rd rod does not use a grommet. Instead, it connects to the steering column with a metal clamp (#3756527) and swivel (#3756526). The lower ends of both rods use GM #3748357 grommets where they connect to the levers on the side of the transmission. Replacements for these grommets are available as part number 91-063 from ClassicParts.com. Their website says "2 required" but that is for each lever (one on each side). So 4 are required to do both levers.
April 2017 -- Overdrive Transmission Wiring
We wanted to keep the electrical hookup & functionality of the overdrive relatively stock. However, finding all of the OE correct parts would have been rather time consuming and expensive. So instead, I was able to put together a relatively factory looking installation using:
Overdrive Lockout Cable:
Reproduction cables are available through sources such as Vintage Auto Garage. But fortunately, I was able to find a good used original cable with the correct style bracket & T-handle for these trucks (it's pictured back on page 4 along with the OD trans).
Relay:
NOS (New Old Stock) overdrive relays are often still available but tend to be rather expensive so I went looking for a lower cost alternative. Functionally, a modern plastic case automotive relay would work but I think they look out of place in an otherwise stock 60's engine compartment. There are some GM horn relays that look very similar to the OE overdrive relay but I don't think the coils in the horn relays are rated for continuous duty. So I chose a Standard Motor Products RY-12. It's a replacement heater blower relay for various GM applications, has a continuous duty rated coil, and is housed in a metal case that looks somewhat similar to the original overdrive relays.
To use the RY-12 as an overdrive relay, I connected the fused power feed wire to both terminals #1 . The wire that powers the overdrive solenoid is connected to terminal #3 on the relay. And the control wire from the kickdown switch is connected to terminal #5. Terminal #2 on the relay is left unused. And I used Packard/Delphi 56-series connectors for an OEM appearance.
Kickdown Switch:
I had originally been thinking of using a NAPA OD6424 kickdown switch as a replacement for the hard to find original. That one is listed for various AMC applications and (other than the connectors) looks similar to the GM switch. But when I tried to order one, I found out it was on long-term backorder. So instead, I picked up a reproduction Studebaker kickdown switch (part number 529479) sold by stude4x4 on eBay. It's a quality U.S. made Cole Hersee switch that looks similar to the GM switch except it has screw terminals (instead of round pin terminals). But that actually makes it easier to hook up when you are making your own wiring harness and don't have the special connector for the GM switch. The Rochester 4G carburetor already had a tab built into the throttle lever that can be used to depress the kickdown switch in the wide open throttle position. I believe that tab was originally used in applications with a TH400. That transmission uses an electric kickdown and was available behind the 327 in certain trucks. So mounting this OD kickdown switch was simply a matter of bending and welding together a couple pieces of ⅛" flat bar to form a mounting bracket for the switch that put it inline with the pre-existing tab on the carburetor's throttle lever.
Wiring Harness:
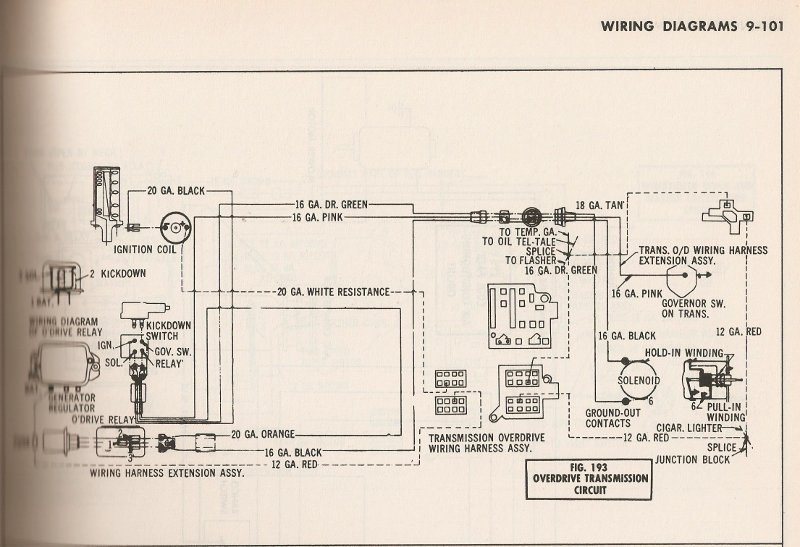
I haven't seen any pre-made overdrive harnesses available for this application. And even if one were available, it would have to be modified for the non-original relay & switch. So I made my own harness using a wiring diagram (shown below) that I found in a 1961 Chevrolet service manual.
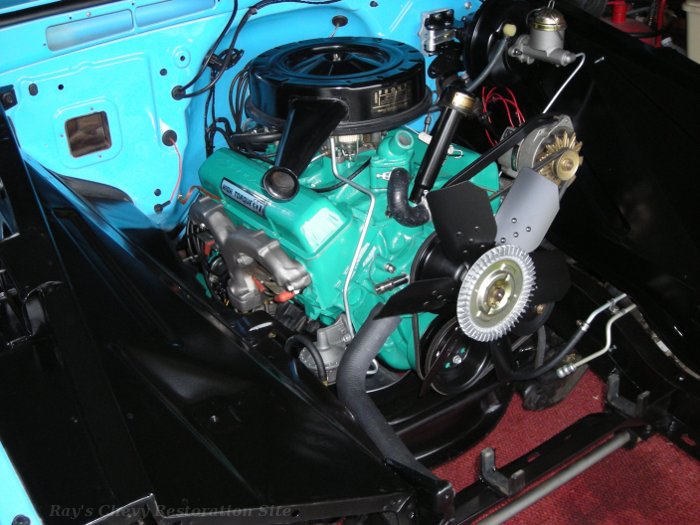
April 2017 -- Engine Detailing / Accessories
In addition to hooking up the overdrive trans, we also bolted all of the external parts & accessories onto the engine. This included the exhaust manifolds (that I sandblasted & painted with POR high-temp gray manifold paint), many of the brackets and pulleys off the original 283 (that were also blasted & painted), along with the Chevrolet script valve covers that I had painted earlier. Rather than use the fixed 4-blade fan off the 283, we chose to upgrade to a 6-blade thermal clutch fan. And we also added power brakes using factory brackets and a re-manufactured OE type booster. The existing master cylinder was re-used after cleaning it up and fitting it with a rebuild kit.
May 2017 -- Painted Radiator Support
I hung the radiator support up using some eye bolts threaded into a couple of the bolt holes and painted it with Summit Racing Semi-Gloss Black Chassis Shield. The factory undercoating on the lower parts of the radiator support was still in good condition so I chose to leave it in place.

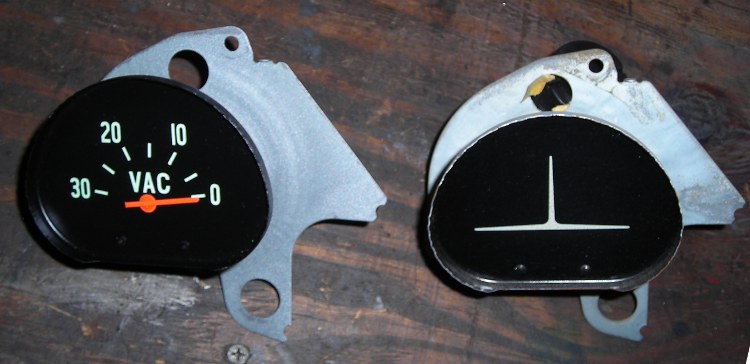
May 2017 -- Added a Vacuum Gauge
Dad had been looking for quite some time to find a factory vacuum gauge to fill the unused gauge spot on the left side of the cluster. After years of not finding anything locally, he decided to splurge on a restored gauge from Redline Gauge and Clock Repair. We purchased it through their eBay store where they list them from time to time.
These simply fit into the same opening as the existing block-off panel and can be installed without taking the instrument cluster out of the truck (although working from up under the dash is not the easiest).
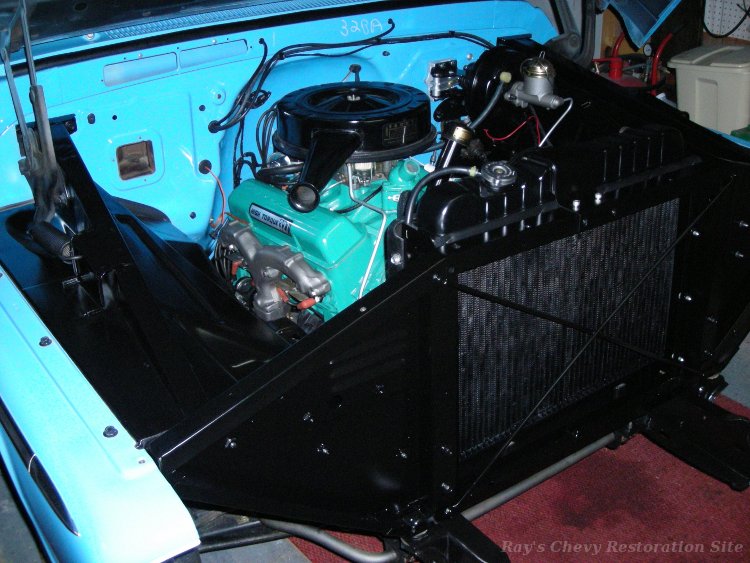
June 2017 -- Radiator Support Back in the Truck
The recently repainted radiator support is back in the truck. I also repainted the side baffle pieces and "stapled" on some new rubber sealing strips. I used some stainless steel wire to make replacements for the rusty staples that originally held the rubber sealing strips in place. The radiator was cleaned up and given a fresh coat of black paint before it went back into place.
June 2017 -- Heater Box Refinish
While we had the under-hood part of the heater box removed from the truck, I took the opportunity to give it a fresh coat of paint. That involved completely dis-assembling the box, stripping it down to bare metal, and spraying it with the same semi-gloss black Summit Chassis Shield paint that I have been using on the other under-hood parts. The lid ended up with a few imperfections in the paint finish so it hasn't been installed yet. I plan on sanding that down and re-spraying it the next time I paint up a batch of semi-gloss black parts.
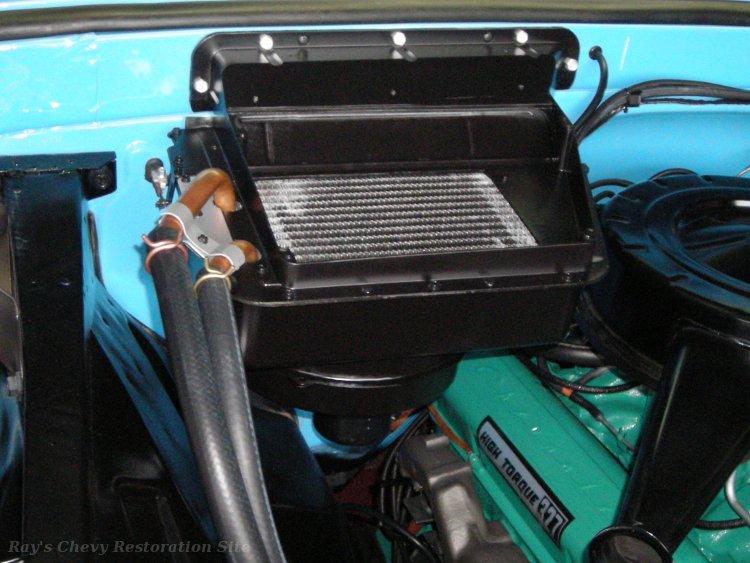
Although the original heater core was not leaking, it was looking a bit corroded. So we decided to replace it with a new one from ClassicParts.com. We bought the OE style copper/brass core for the deluxe heater but unfortunately the inlet & outlet tubes on the replacement were spaced slightly farther apart than the original and bent slightly different. So fitting it into the heater box required some minor grinding to widen the slots for the tubes to pass through. And I had to fabricate a new tube support bracket since the tubes didn't line up with the original bracket. Looking back on it, we might have been better off buying the less expensive aluminum replacement heater core (that one looks like it comes with it's own tube support bracket). In this photo, the original tube brackets are on the left and the ones I fabricated are on the right.
July - August 2017 -- New Exhaust System
The old single exhaust system from the 283 would have bolted right up to the 327. But it was getting rusted thin in many areas and we found a few tiny holes in the crossover pipe. So the decision was made to install new pipes and upgrade to a dual exhaust system. Unfortunately, no one makes a manifold-back dual exhaust kit for these trucks that works with the original manifolds that exit straight down. The closest I could find is the Heartthrob Exhaust kit #8141430 that is listed as fitting 1963 to 1972 GM 2WD trucks but has a note stating it won't fit the straight down exit ram's horn manifolds. It is designed for the 1967 to 1972 style manifolds that have rear angled outlets.
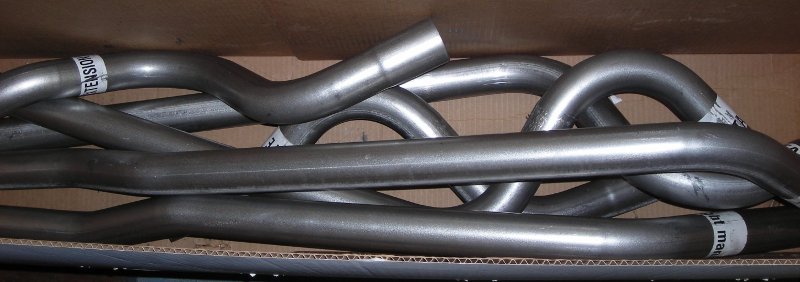
Since the only difference was the angle of the manifold outlets, we ordered one of those #8141430 kits along with a couple of 90° mandrel bends and some straight pipe. The plan is to use the 90° bends and straight pipe to fabricate some new manifold down-pipes that will work with the stock straight down exit manifolds. And then use the #8141430 kit from there back.
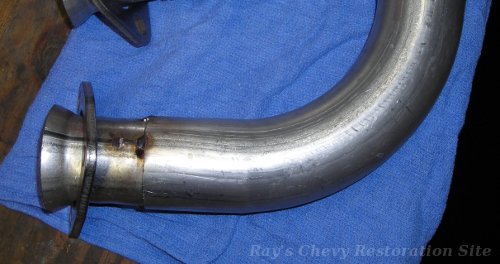
The following photo is one of the down pipes in progress. I cut the flared end off a Walker #41724 adapter pipe and tack welded it to a 2¼" mandrel bent 90° elbow. And I removed the 2-bolt flange from the Walker adapter and replaced it with one of the 3-bolt hole flanges from the Heartthrob kit. After test fitting, the joint between the two pipes was welded solid and a short chunk of 2" pipe was welded to the inside of the flared end to support the donut gasket.
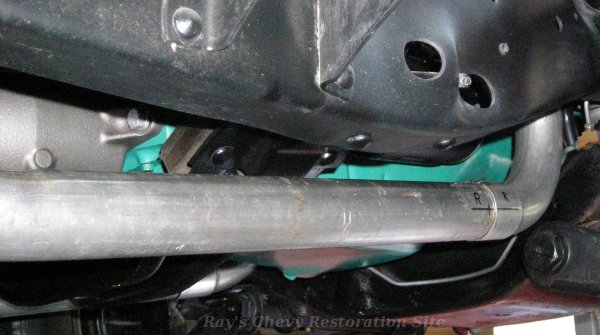
This next photo shows the right (passenger side) manifold down pipe temporarily installed on the truck. As can be seen, the pipe angles downward toward the rear since the engine & trans are mounted in the chassis at an approximately 5° angle. Following this downward angle allows the pipe to clear the crossmember underneath the bellhousing. However, the pipe eventually needs to level out and run parallel with the frame. So we had to add a 5° bend approximately 2 feet back from the 90° elbow (the bend can just barely be seen to the far left in the photo). Those 5° bends (one on each side) were done at a local shop with exhaust bending equipment. They're not mandrel bends like the rest of the system, but at such a shallow angle they don't crush / restrict the pipe like a sharper non-mandrel bend.
August 14, 2017 -- Start Up
After finishing up the exhaust, we had everything in place to start the 327 up for the first time in the truck. It fired right up on the first try but we did have to shut it down due to a minor gas leak. It was just a flare fitting that had to be tightened down a little more so it was a quick & easy fix. Since this engine had been running in the 63 Impala and we didn't replace any internal parts, there was no need for any special break-in procedure.
- Continue on to Page 6 (September 2017 - present ... A Few More Updates)
- Return to Dad's 66 C10 Truck Page
- Return to Ray's Chevy Restoration Site Home Page
- © 1998 - 2023 Raymond McAvoy. All Rights Reserved.