Page 4 of 8 ... August 2004 - April 2007
August 2004 -- A 409 for the 63 Impala
Dad purchased a 409 engine that we'll be rebuilding and eventually swapping into his 63 Impala SS.
This particular 409 is stamped "T0513QG" on the front of the block which indicates that it was assembled at GM's Tonawanda NY engine plant on May 13th. The "QG" indicates that it is a 340HP 409 that was originally mated to a PowerGlide transmission. We plan on rebuilding it close to the original 340HP specifications. It will be used with the 63's original PowerGlide transmission.
November 2004 -- Start of the 409 Engine Rebuild
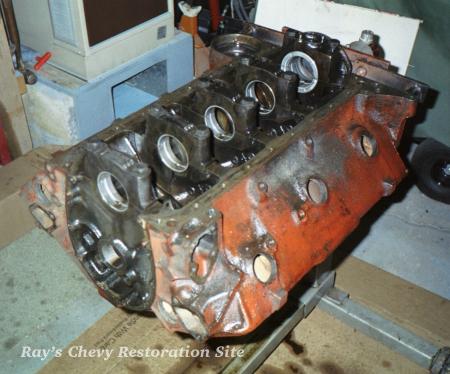
Here's the 409 disassembled and ready to go to the machine shop to be cleaned, magnafluxed, and bored .030" over to clean up the worn cylinder bores. The crankshaft will also be taken to the machine shop to be cleaned, magnafluxed, and ground .010"/.010" to restore the slightly worn journals.
January 2005 -- Some New Parts
Dad purchased a set of .030" over pistons, bearings, gaskets, and several other parts necessary to rebuild the 409.
February 2005 -- Crankshaft and Block go to the Machine Shop
We took the block, crankshaft, connecting rods, and pistons to the machine shop. In addition to boring & honing the block to fit the new pistons, we had the shop recondition the connecting rods, fit them with ARP rod bolts, and install the new pistons.
March 2005 -- Back from the Machine Shop
The 409 is back from the machine shop and nearly ready to assemble. However, we still have to round up a few parts to complete the engine and the cylinder heads still need to go to the machine shop for some new valve guide inserts and a valve job.
April 2005 -- Some More Parts
Our friend "Murph" helped us locate an intake manifold, carburetor, and a fan shroud that will be necessary when we swap the engine into the Impala.
May - October 2005 -- On Hold for a While
Dad & I moved our auto repair shop to a new location so we put the 409 project on hold for the summer.
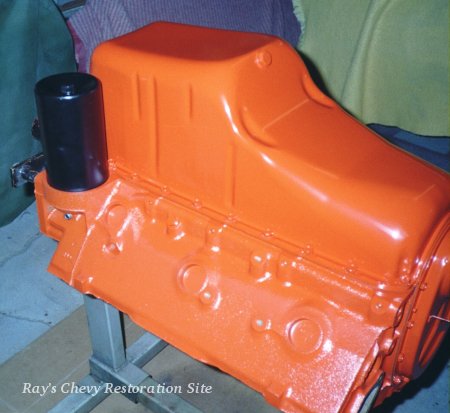
November 2005 -- Starting to Assemble the 409
I installed the new frost plugs, cleaned, primed, and painted the outside of the block with some Chevy orange engine enamel. I also gave all the oil passages a thorough cleaning with brushes and compressed air to remove any dirt/debris that remained after the block was cleaned at the machine shop.
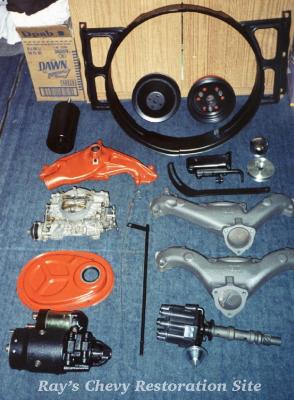
Here are some of the parts that we have collected and restored for the 409. The parts in the first photo include:
- Oil Filter Canister (came with engine) -- cleaned and painted
- Fan Shroud -- sandblasted and painted
- Water Pump Housing (came with engine) -- sandblasted, painted, and awaiting rebuild kit
- Alternator Brackets (came with engine) -- sandblasted and painted
- Pulleys -- crank and alternator pulleys are new GM, water pump is used
- Carburetor -- it's a Carter AFB but it fits right on the 340HP 409 intake without the use of an adapter. The 340HP 409's originally used Rochester 4GC carburetors.
- Timing Chain Cover (came with engine) -- cleaned and painted
- Exhaust Manifolds (came with engine) -- sandblasted and painted
- Dipstick (came with engine) and new reproduction tube to replace the rusty one that came with the engine
- Starter -- AC Delco re-manufactured -- it came with a regular 2-bolt nose that I swapped for the 3-bolt nose that's used on 409's with PowerGlide transmissions
- Distributor -- re-manufactured
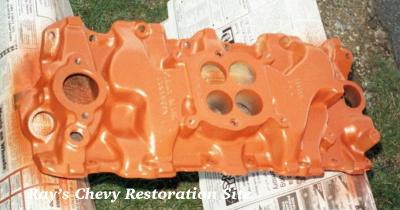
The second photo is the intake manifold after being sandblasted, cleaned, and painted.
December 2005 -- A New Oil Pan
The oil pan that came with the engine had been cut and modified for chassis clearance in another vehicle so we bought one of the new reproduction oil pans that have recently become available from Show Cars Automotive, Inc.. In my opinion, this new pan is an excellent reproduction. It seems to be made of similar gauge steel as the original and has all of the "ribs" on the sides and other details stamped into the metal just like the original.
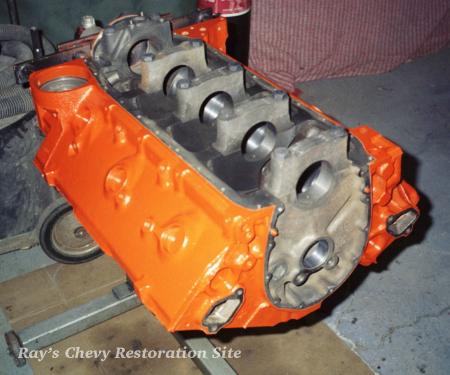
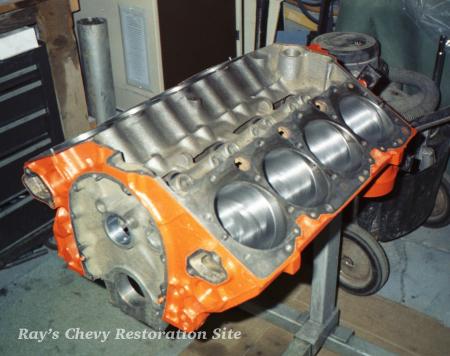
January 2006 -- Engine Assembly Continues
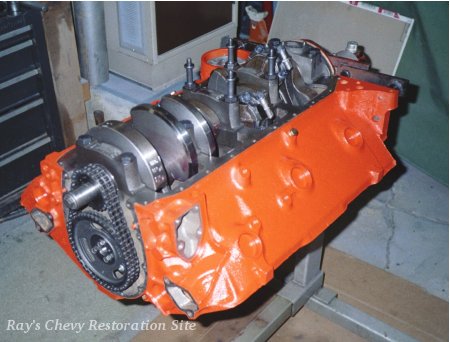
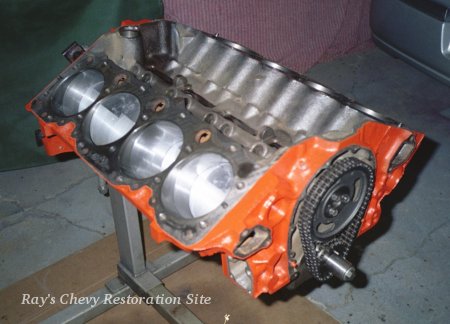
The bottom end of the engine rebuild is now complete. Installing the new pistons in the 409 presented a little bit of a challenge due to the block deck surface being at an angle to the cylinder bores. My GM Shop manual shows a regular band type piston ring compressor being used upside down on 348/409 engines. That allows it to enter the angled combustion chamber area of the block. However, the band clamp on my ring compressor was too close to the edge to be used in such a manner. So I ended up making a homemade ring compressor from a rolled up band of thin sheetmetal and a large hose clamp. I tack welded some stopper tabs to the outside of the sheetmetal band so it would only go down into the block far enough to meet up with the step where the finished cylinder walls meet the combustion chamber. I wasn't sure if it was going to work very good at first, but it ended up being pretty slick. I've heard that this isn't an issue on blocks with a larger overbore since the step from the combustion chamber to finished cylinder wall is eliminated and the rings can simply be compressed by hand while the pistons are being installed.
The new reproduction oil pan turned out to be a good fit. I had to pry slightly with a screwdriver in an adjacent bolt hole in order to get some of the bolts to line up. But I've had to do that with replacement oil pans on other engines as well. These new oil pans appear to be designed from the original high performance (400 & 425HP) pans rather than the 340HP pans so they have a smaller baffle that works with a windage tray. So prior to installing the pan, we decided to add a windage tray (that we already had) to this engine. Being a 340HP version, it didn't have the necessary mounting studs but GM#3902885 big block studs are very close. They just had to be cut off a little since the bolt end is about ⅛" longer. I also added a Jegs #555-23620 oil pickup tube retainer prior to bolting on the oil pan.
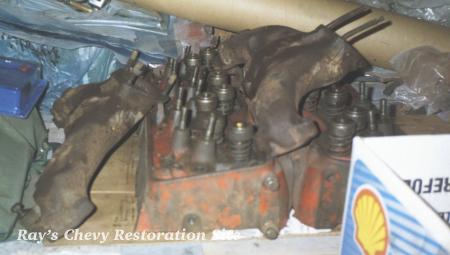
February 2006 -- Inspecting the Cylinder Heads
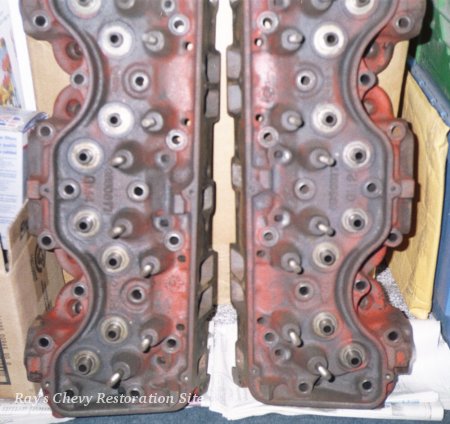
I disassembled and inspected the heads to see what they will need for machine shop work. None of the valves were sunken into the seats so they should be good to go with a seat regrind. The valve guides will definitely need some inserts and some of the valves had worn stems so a new set of valves will be in order.
March - September 2006 -- On Hold Again
We put the 409 project on hold again this summer to spend some time on Dad's 1977 GMC.
October 2006 -- Heads go to the Machine Shop
The heads are at the machine shop getting cleaned, resurfaced, having new valve guides installed, and having the valve seats reground.
November 2006 -- Heads Back from the Machine Shop
After getting the heads back from the machine shop, I cleaned them with some brake parts cleaner, masked them off, primed them, and gave them a fresh coat of Chevy Orange engine enamel.
The block has not been decked (factory deck height) so we used some steel shim head gaskets (like the factory originals) to maintain the proper compression ratio and quench distance. I sprayed both sides of these gaskets with a couple coats of Permatex Copper Spray-A-Gasket to help ensure a good seal.
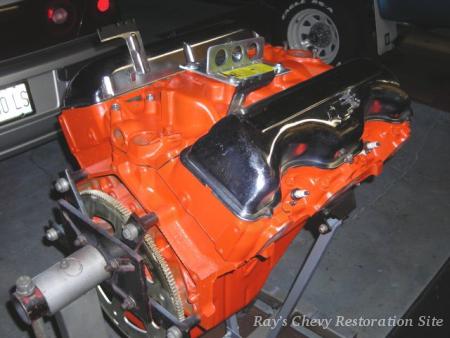
December 2006 -- Engine Rebuild is Complete
The 409 rebuild is complete. However, we still need to purchase a new exhaust system, engine wiring harness, radiator, and other miscellaneous parts that will be needed for the engine swap.
April 2007 -- Some Good Used Valve Covers and an Oil Pump Priming Tool
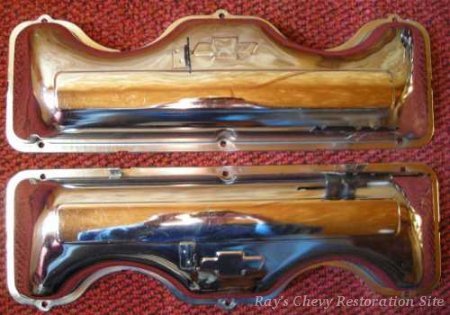
I picked up a nice set of original chrome valve covers on eBay. They had a few little dents/dings and some fine scratches but no rust or peeling chrome. I was able to straighten out the dents/dings and polish up the chrome to make them look even better. I also re-coated the spark plug wire separators with some black Plasti-Dip rubberized coating.
I sat the new chrome valve covers in place and snapped this photo:
My home-made oil pump priming tool (made from an old HEI distributor with the advance weight mechanism removed and the gear teeth ground off) won't fit the 409. So I simply swapped the modified shaft over into an old 348 truck distributor housing. The gauge I had hooked up was showing oil pressure within seconds of turning the priming tool with a drill. And it took less than a minute before oil was flowing through all the pushrods and onto the rocker arms.
- Continue on to Page 5 (October 2007 - February 2012 ... Suspension Rebuild and Engine Compartment Detailing)
- Skip to Page 6 (February - August 2012 ... 409 Engine Install and Start Up)
- Skip to Page 7 (September 2012 - September 2015 ... More Detailing and Miscellaneous Projects)
- Skip to Page 8 (October 2015 - present ... A Few More Updates)
- Return to Dad's 63 Impala Page
- Return to Ray's Chevy Restoration Site Home Page
- © 1998 - 2023 Raymond McAvoy. All Rights Reserved.